Search This Blog

Monday, July 18, 2011

One pie is just never enough


The responsibility of making dessert for July 4th fell on me this year, but I guess that's just an occupational hazard of being a baker. The real problem is when I want to make peanut butter pie topped with banana pudding and chocolate whipped cream, but my mom would really prefer classic apple pie a la mode. The logical solution? Make both.


Unfortunately I only got one picture of the peanut butter/banana/chocolate crazy layers pie before I smudged it (and by "smudged" I mean "ate"). From top to bottom it's chocolate whipped cream, sliced bananas, vanilla pudding, more sliced bananas, and baked peanut butter pie all piled into a graham cracker crust. Half of the brainstorming credit for this pie goes to brother Beau who I always consult with on food-related matters.


The apple pie I just kind of threw together. I started with a cinnamon pie crust which I filled with chopped apples tossed with sugar, cinnamon, nutmeg, allspice, ginger, lemon juice, and flour; then I covered that with another cinnamon crust and topped it with a mixture of oats, melted butter, sugar, cinnamon, and flour. The crunchy oat topping contrasted perfectly with the gooey filling (if I do say so myself!), and the addition of vanilla ice cream and homemade whiskey caramel really rounded it out.


More thorough recipes available by request!

Thursday, June 16, 2011

work, work, and more work (not that I'm complaining)

My, how time flies! I've been working up a storm and we'll go ahead and use that excuse to explain why I haven't blogged since the dinosaurs walked the earth. Because it couldn't possibly be due to laziness... Aaaanyway, I've been working a lot, like I said, at a little bakery called Sweet Treets, and rather than bombard you with the usual ramblings and recipes, I'm just going to post some pictures that I've taken at work. So without further ado:

Chocolate Chip Cookie Dough Cupcakes

A cupcake tower brimming with tiny cupcakes

12 of over 100 flowery cupcakes I decorated for a birthday

A cake under development

Same cake, still in the development process

The finished product

Good old chocolate cupcakes with vanilla buttercream in the foreground and raspberry buttercream in the background


That's all for now folks! I'm hoping to get in here soon with some real pictures to look at and some recipes that very few people (if any at all) will actually bake. It's cool though, just come over and I'll bake for you!

Saturday, March 26, 2011

Crappy cell phone pics, anyone?

Damn it's a good thing I'm not a professional food blogger, because to say that the pictures I'm about to show you are crappy is kind of an understatement. However, I'm hoping that the nature of the pictures makes up for their devil may care attitude. Okay, here we go.


You see what I mean? Anyway, Mardi Gras was earlier this month and as my family uses any excuse to party, we had a Cajun-themed dinner of gumbo followed by sweet, fluffy beignets. I had made beignets at work (I'm going to use my job to excuse myself from not having posted in I-don't-know-how-long since I work at a bakery and, come on, would you want to go to work and bake all day, then come home and bake some more? ...Who am I kidding? I do that anyway) and although they turned out really great once we oven-lovin' bakers learned our way around hot oil, I thought they needed something. So I made them at home and added cinnamon. That's a bingo!

I made a few changes to this recipe from Paula Dean which - amazingly - doesn't use butter! What were you thinking, Paula?

French Quarter Beignets
Ingredients

1 1/2 cups lukewarm water (around 100 degrees F- make sure the water isn't too hot or it will commit double homicide against the yeast and your final product)
1/2 cup granulated sugar
1 envelope active dry yeast
2 eggs, slightly beaten
1 1/4 teaspoons salt
1 cup evaporated milk
7 cups bread flour
3/4 teaspoon cinnamon
1/4 cup shortening
Nonstick spray
Oil, for deep-frying
3 cups confectioners' sugar

Directions

Mix water, sugar, and yeast in a large bowl and let sit for 10 minutes.

In another bowl, beat the eggs, salt and evaporated milk together. Mix egg mixture into the yeast mixture. In a separate bowl, measure out the bread flour. Add about 3 cups of the flour and the cinnamon to the yeast mixture and stir to combine. Add the shortening and continue to stir while adding the remaining flour. Remove dough from the bowl, place onto a lightly floured surface and knead until smooth. Spray a large bowl with nonstick spray. Put dough into the bowl and cover with plastic wrap or a towel and let rise in a warm place for at least 2 hours.

When about ready to cut and fry beignets, preheat oil in a deep-fryer to 350 degrees F.

Add the confectioners' sugar to a paper or plastic bag and set aside.

Roll the dough out to about 1/4-inch thickness and cut into 1 1/2-inch or bigger squares (the original recipe calls for 1 inch squares but I found that the smaller beignets were extremely uncooperative during the frying process and oftentimes refused to flip. Also, bigger squares mean bigger beignets!). Place about 10 beignets into the oil at a time, flipping constantly, until they become a golden color (if some of your beignets still won't flip, my dad and I found that gently stirring them with a big metal slotted spoon helped them to fry more evenly). Drain them on a paper towel and, every 5 or so batches, toss the beignets in the confectioners' sugar to coat. Or, you can wait until all the beignets are fried and then sift powdered sugar over them.

This recipe makes a TON so you should probably invite people over to help you eat them. Seriously, the first picture is only of half of the beignets. And the second picture is of this:

Monday, December 27, 2010

Amidst the Holidays


These days between Christmas and New Years is one of my favorite times of the year. The Christmas stress is over, I have no pressing matters to attend to, and it's cold enough outside that I can excuse myself from the public sphere and wallow in all my new stuff (such as this from my brother George and this from my brother Beau, not to mention the amazing photo studio from my parents! Are you guys ready for consistently decent photos? I sure am). Of course, the entire week before Christmas was spent making candy and baking for family and friends, but I'll save those details for the next few entries. In the meantime, I bring you something I made before the holiday insanity ensued: Pecan Tassies. They're like tiny little pecan pies (but even more delicious, in my opinion), and my mom and I used to make them all the time when I was little. In the past few years, however, they seem to have fallen to the back burner and I felt it was time to bring them up again.


Pecan Tassies
Recipe from this deliciously odd blog.

Crust:
1 3oz package cream cheese
1/2 cup butter
1 cup flour

Blend cream cheese, butter and flour until the mixture resembles coarse meal. Bring together with hands until just combined, and sticks together. Divide dough into two equal portions and roll into 12 inch logs. Refrigerate wrapped in plastic wrap. While the dough is chilling, make the filling (rhyme brought to you by the original poster).

Filling:
2 eggs
1 1/2 cups brown sugar
dash of salt
2 tablespoons butter, softened
1 teaspoon vanilla
2/3 cup chopped pecans

Grease and flour a 24 cup mini-muffin pan. Unwrap logs of dough and cut each log into 12 equal pieces. Roll each piece of dough into a ball and put into a muffin cup. Using the "pusher" tool from a meat grinder or a pestle (or something that is shaped like one of those things), press the dough into each muffin cup until it comes up the sides to the top of the cup. (The original recipe poster has really good pictures of this process in case my extremely clear instructions are confusing.) Make sure you dip the end of the pusher/pestle in flour before pressing each ball of dough- otherwise, the dough will stick to the tool and it is annoyingly persistent and difficult to remove. Once all the balls of dough are pushed into the shapes of tiny pie crusts, set aside.

Preheat oven to 325.
Beat butter and brown sugar together until well combined. Add eggs, vanilla and salt and beat until creamy. Place half the nuts on the bottom of each tassie cup, then top each with 1 teaspoon filling, followed by remaining nuts. Bake at 325F for 25 minutes, or until golden brown.


Cool in pan until tassies are cool enough to remove, then transfer to a wire rack to cool completely. These things are seriously delicious.


Aaaaand the money shot:

Oh yeah. Check out those gooey innards! Delicious. And one more thing before I go:

My parents got me a Kitchenaid - complete with flame decals like Alton Brown's! - as a graduation present! (Did I mention I graduated?)

Saturday, December 18, 2010

Making Up For Lost Time


I love cold weather. My favorite thing about it, though, is avoiding it by cuddling up on the couch with a book or some good old tv. And hot chocolate, of course. What is winter without hot chocolate? After 20 years of life, I think I've finally created my favorite hot chocolate recipe. It's easy to make and has a super secret ingredient! Alright, it's not a super secret, it's ice cream (because I really like ice cream).

Hot chocolate
1 scoop chocolate ice cream (I used Blue Bell)
1 ounce milk chocolate chips
3/4 cup milk (whole milk will make it super creamy, but there's nothing wrong with lower fat milk if that's the way you want to go)
small pinch of salt
tiny dash of vanilla extract

Put everything into a mug and microwave it for one minute (keep an eye on it so that the milk doesn't boil over). Let it stand for about 5 minutes so that the chocolate chips melt, then stir it until the chocolate is mixed into the milk. If you have a milk frother (looks like this), use it to blend the hot chocolate; this incorporates the chocolate into the milk completely so that the consistency isn't grainy. If you don't have a milk frother, pour your hot chocolate into a blender and pulse it a few times, then pour it back into the mug. Reheat for 30 seconds if it has cooled off too much, then enjoy!

This recipe is fun because you can use different flavors of ice cream, such as strawberry or mint! That will keep life interesting, I'm sure. Before I duck out, check out this cute mug I got from the Good Will for 99 cents:

Friday, December 17, 2010

I Should Be Fired

Has it really been one month and seven days? Seriously, it's a good thing blogging isn't my profession or I would definitely be fired. But I have excuses, Boss: finals. Isn't that reason enough to abandon my duties? No? No, not really. But still, finals are time consuming little buggers and even though I could still find the time to bake, taking pictures and blogging are another thing. So for this post, I'm pulling from my reserves but I promise to be back in action, especially considering that I have some serious baking coming up in the next week.

This recipe comes from the same bakeress as the stoner cookies, with some of my own alterations.


Chocolate Overload Mud Pie*

Chocolate Cookie Crust:
16 ounces Oreo Cookies (about 40 cookies or one package)
6 tablespoons unsalted butter, melted

Flourless Chocolate Cake
4 tablespoons unsalted butter
6 ounces dark chocolate, chopped
1 tablespoon espresso powder
1/4 cup strong coffee, at room temperature
1/4 teaspoon salt
1 teaspoon vanilla extract
6 large eggs, separated, at room temperature
1 cup sugar

Chocolate Pudding
2 slighly heaping tablespoons sugar
2 1/2 tablespoons cornstarch
2 tablespoons unsweetened cocoa powder
pinch of salt
1 1/2 cups milk
1/2 cup heavy cream
4 ounces semisweet chocolate, chopped
1 teaspoon vanilla extract
3 tablespoons whiskey (optional but recommended!)

crushed toffee pieces and chocolate whipped cream for topping (optional)

To make the crust:
Preheat oven to 300F.
Lightly spray a 9-inch springform pan with baking spray. Line with parchment, spray that and the sides of the pan. In a food processor, grind the cookies into a fine crumb. Add the butter and pulse until well combined.
Place all of the crumb mixture into the springform pan and press along the bottom and up the sides.
Place in freezer for 10 minutes, then remove and bake for 10 minutes. Let cool on a wire rack.

To make the flourless cake:
Increase oven temperature to 350F
Using a double boiler, melt the butter and chocolate together. Set aside to cool.
In a small bowl, whisk together the espresso powder, coffee, salt and vanilla. Set aside.
In the bowl of a standing mixer fitted with the whisk attachment (or in a large bowl with beaters), beat the egg yolks with 1/2 cup of the sugar until the mixture is light and has almost doubled in volume, about 5 minutes. Add the chocolate mixture and beat until just combined, scraping down the sides once. Add the coffee mixture and beat until just combined, scraping the sides again.
In a clean bowl fitted with the whisk attachment (or with beaters), beat the egg whites until foamy. Gradually increase the speed to high and add the remaining 1/2 cup of sugar, beating until soft peaks form.
Scoop 1 cup of egg whites into the chocolate mixture to lighten the batter. Using a rubber spatula mix the egg whites into the chocolate batter. Gently fold in the remaining egg whites.
Pour the batter onto the cooled cookie crust and bake for about 40 minutes, so the cake is set but still slightly jiggly. Transfer it to a wire rack and cool completely. The cake will sink in the middle; don't worry, you will fill it with pudding. Once cool, cover in plastic wrap and chill for 3 hours while you make the pudding.

For the pudding:
Whisk together the sugar, cornstarch, cocoa powder, and a pinch of salt in a 2-quart heavy saucepan, then gradually whisk in the milk and cream. Bring to a boil over medium-high heat, whisking constantly, then boil for 2 minutes, whisking constantly. Remove from heat. Whisk in the chocolate, vanilla and whiskey until smooth.
Cover the pudding with wax paper to prevent a skin from forming and chill until cold, at least 2 hours.

To assemble:
Stir the pudding to loosen it, then pour it on top of the cake, making sure to stay inside the cookie crust boarder.
Return cake to refrigerator until ready to serve.
When ready to serve, top with chocolate whipped cream (whip cream with sugar to taste and 1 tablespoon of cocoa powder) and crushed toffee pieces.


The pudding in the original recipe is milk chocolate, but I thought that would be too sweet so I used semisweet chocolate instead. The whiskey isn't in the original recipe, either, but my brother (Beau) and I went through a let's-add-whiskey-to-everything phase and decided last minute that chocolate whiskey pudding would probably be pretty good. And it was. So that about wraps things up, sorry for the (third in my blogging career) hiatus, I'll try to keep those to a minimum. Look forward to tasty things in the future like hot chocolate and pecan tassies!


*These pictures aren't actually of Overload Mud Pie, but they're the same cookie crust and pudding recipes so they're pretty close. The actual pictures are from my phone and they are crappy.

Wednesday, November 10, 2010

Stoner Cookies and Why I'm Okay With Being So Damn Short


Over this last weekend my brother, George, raced yet another Ironman at Panama City Beach and lived to tell the tale. He placed fourth in his age group so many congratulations are in order (and also: what are you trying to prove??)! My parents accompanied him on this journey so my other brother, Beau, and I had free reign of the house, and we (I) spent all of sunday tearing apart the kitchen and then we (Beau) cleaned it all up. All of that just to make these cookies:


You can pretty much already tell it was worth an entire day's effort. These cookies are an adaptation of Peabody's Chubby Hubby Cookies, which she calls "stoner food," hence: Stoner Cookies. I can't call my adaptation "Chubby Hubby Cookies" because they aren't the greatest representation of Ben&Jerry's Chubby Hubby Ice Cream (fun fact: my mom and aunt were friends with Ben and Jerry growing up!) which is "Fudge Covered Peanut Butter Filled Pretzels in Vanilla Malt Ice Cream Rippled with Fudge & Peanut Butter" (that's straight from the website). Why, you ask, are my cookies not the greatest representation of this ice cream? Two reasons. One: my grocery store stocks the plain malted milk powder at the very back of the top shelf, and I am all of five-foot-one which isn't even remotely tall enough to reach that and no tall people were around; the chocolate malted milk powder, however, was right in the front, easily accessible to my short-person hands. I am perfectly alright with this though because the chocolate malted milk cookies were delicious. And two: I couldn't find peanut butter filled pretzels for the life of me so I just bought regular ones.

Chocolate Malted Milk Cookies:

4 cups all-purpose flour
3/4 cup chocolate malted milk powder
2 teaspoons baking powder
1/2 teaspoon baking soda
1/2 teaspoon salt
2 sticks unsalted butter, at room temperature
1 cup firmly packed dark brown sugar
1 cup granulated sugar
2 eggs
1/2 cup sour cream
2 teaspoons vanilla extract

In a medium bowl, whisk together the flour, malt, baking powder, baking soda, and salt. Set aside.
In a large bowl, beat the butter and sugars together until light and fluffy. Scrape down the bowl and add the eggs, one at a time, beating until each is incorporated. Add the sour cream and vanilla and beat until just incorporated. Add half of the dry ingredients all at once and mix until almost combined. Add the remaining dry ingredients and mix until just incorporated. Cover the dough with saran wrap and stick the bowl in the fridge for at least long enough to watch most of Evil Dead and two episodes of Weeds (these are Stoner Cookies, after all), approximately 2 1/2 hours.
Preheat the oven to 350F and line two baking sheets with parchment paper.
Using a cookie scoop or a spoon, scoop about 1 tablespoon of dough at a time. Roll into a ball and place on cookie sheet, keeping about 2 inches of space between each dough ball.
Bake the cookies for 9-12 minutes or until they are slightly browned. (12 minutes for a crispy cookie, 9-10 minutes for a chewy one.) Allow the cookies to cool on the pan for a few minutes before transferring to a wire rack to cool completely.

Peanut Butter Filling:
4 ounces vegetable shortening, at room temperature
3/4 cup natural peanut butter (natural peanut butter is important! the water content is higher or something which keeps the dough from being too dry. you can use Jif like I did if you don't have natural peanut butter, but you'll have to double the amount of pb used)
3 1/4 cups powdered sugar, sifted
1/2 tsp. salt
1 tsp. vanilla extract

In a large bowl, beat the shortening and peanut butter until smooth. Add the sugar in three parts, mixing after each addition. Add the salt and vanilla and beat for 10 seconds. The filling should be thick but spreadable. You can add a few drops of water here and there if it’s too thick.
Using a small spoon or a 2-tablespoon cookie scoop, spoon the filling onto the flat side of one cookie. Place another cookie, flat side down, on top and press down slightly so the filling spreads to the edges of the cookie.

Milk Chocolate and Pretzel Coating
12 ounces milk chocolate
2 tablespoons vegetable shortening
12 ounces pretzels (or peanut butter filled pretzels), crushed

In a double boiler, combine chocolate and shortening. Stir until chocolate is completely melted and smooth, then remove top bowl from double boiler. Dip each cookie into the chocolate and immediately roll in crushed pretzels. Place on waxed paper to harden.


Let Klaus quell any doubts you may have about these cookies:

Wednesday, November 3, 2010

Happy Quarter Century, Brother!


Yesterday my oldest brother turned a little older, and he being the wise man that he is requested Carrot Cake Cheesecake for dessert. After unsuccessfully looking for a recipe online, I took a leaf out of my mom's book, said screw it, and just assembled a recipe myself based on my go-to carrot cake and cheesecake recipes. It goes a little something like this:

Cheesecake
adapted from McCall's Best Cheesecake to make the Carrot Cake Cheesecake AND another little cheesecake, so if you don't want an extra cheesecake, divide this in half-ish (but come on, who doesn't want extra cheesecake?)

2 lbs cream cheese (that's 4 8oz packages), room temperature
5 eggs
1 1/2 tsp vanilla extract
1 1/3 cup sugar
pinch salt

Beat the cream cheese in a large bowl until creamy. Add eggs, vanilla, sugar, and salt and continue beating until thoroughly combined. If you're making an extra cheesecake, pour half the batter into a graham cracker crust (homemade or storebought, whatever fancies you) and bake in a preheated to 375F oven for 30-35 minutes. Set the rest of the batter aside to make the carrot cake.

Carrot Cake

1 cup sugar
3 eggs
3/4 cup oil, plain greek yogurt, or a mixture of the two
1 1/4 cups flour
1/2 tsp salt
1 tsp baking soda
1/2 tsp cinnamon
1/8 tsp nutmeg
1/8 tsp cloves
1/4 tsp ginger
1/4 cup chopped walnuts
1/4 cup sweetened shredded coconut
3/4 cup apple, finely chopped
1 1/2 cups carrot, grated

Preheat the oven to 350 degrees F. Beat sugar and egg together, then slowly add oil/yogurt. In a separate bowl, combine flour, salt, baking soda, cinnamon, nutmeg, cloves, and ginger, then sift over sugar mixture. Mix until mostly combined, then add walnuts, coconut, apple, and carrot and mix together. Grease and flour a 9 in springform pan, then place pan inside a bigger, shallow pan. This is not for a water bath! It's to contain the goopy, drippy carrot cake batter that will inevitably seep out the bottom of the pan, catching your oven on fire without something to catch it. I'm not speaking from experience... just offering foresight. Yeahhh... Anyway, pour your carrot cake batter into the springform pan, then spoon the cheesecake batter on top of that and spread it evenly. Put the whole thing in the oven and set your timer to 40-45 minutes. Make sure the top of the cheesecake doesn't get too brown as this is a sign of overbaking, oh no! When your timer alerts you that the cake is done, remove it (the cake, not the timer) from the oven and put it somewhere to cool down. Once the cake is room temperature, put the whole thing in the fridge. If you accidentally leave it uncovered and become worried that the top has dried out too much (again, not speaking from experience, merely foresight), make this topping:

6 oz cream cheese
4 oz sour cream
1/8-1/4 cup sugar, depending on preference
pinch salt
2-3 tablespoons whiskey/bourbon/whatever alcohol tastes best to you, OR 1/2 tsp vanilla extract

Cream the cream cheese and sour cream together, then add the sugar, salt, and alcohol and beat until thoroughly combined. Taste the topping and adjust as needed. Use a knife to go around the edges of the cake to loosen the sides from the pan, then dump the topping atop the cake and smooth with the back of a spoon because a knife would never work at this angle. When you're ready to serve, remove the side of the pan and you're good to go. Store covered in the fridge.


And here's what your extra cheesecake might look like, assuming you made one and then took a crappy cell phone picture of it:

Wednesday, October 27, 2010

Reasons That I Love Fall

There are so many good things about fall and wintertime in general. For instance: hot chocolate, homemade marshmallows, wrapping up in a blanket on the couch to watch tv and avoid the cold outside, and my personal favorite: all things pumpkin. And, bonus!!, to make up for my total lack of tasty pictures in my previous post, I'm going to throw a pumpkin at my computer for an absolute pumpkin explosion! Or maybe I'll just give you 2 completely different things that you can do with the same recipe for a different kind of pumpkin explosion (since I have all of my school work saved on my computer and I guess I kind of need that). Okay, on with the recipe:

Pumpkin (enter baked good here):

1 cup pumpkin puree (NOT pumpkin pie mix!)
2 cups sugar
2 eggs
1/2 cup oil
2 1/4 cups flour
1 tablespoon pumpkin pie spice
1 teaspoon baking soda
1/2 teaspoon salt

Lightly beat eggs in a medium bowl, then add pumpkin puree, sugar, and oil and combine well.
In a large bowl, whisk together flour, pumpkin pie spice, baking soda, and salt. Make a well in the center and add the wet ingredients. Mix just until combined.

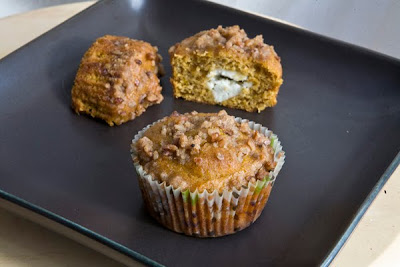
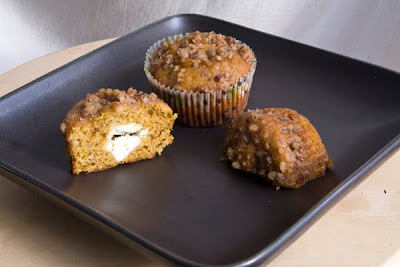
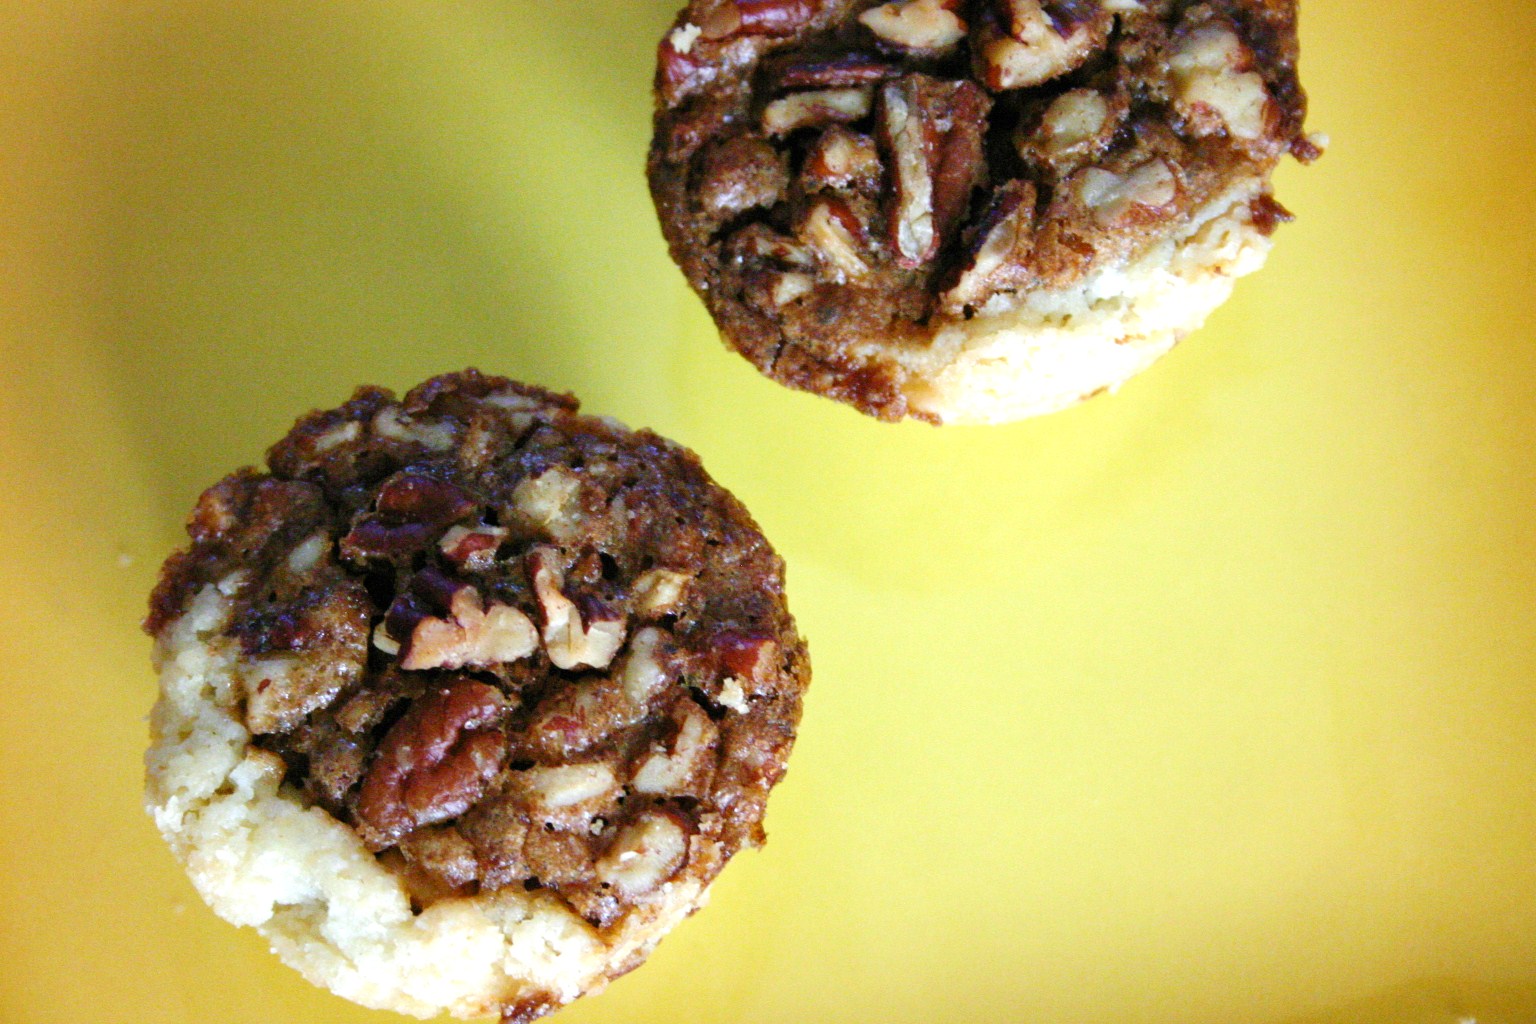
Now, for the first recipe (the easier/less time consuming of the two), Pumpkin Muffins with cream cheese filling and a pecan topping*. I've been making these every year for as long as I can remember, and I've never met anyone who didn't love them. They are by far the most requested baked good around this time of year.


Here's what else you need for the muffins:
8 oz cream cheese, room temperature
about 3-4 tablespoons sugar, depending on your preference

1/2 cup brown sugar
1/3 cup flour
2 tablespoons butter, melted
1/2 cup chopped pecans

Combine the cream cheese and the sugar in a small bowl and set aside.
Combine the brown sugar, flour, butter, and pecans in another small bowl and set aside.
*The pecan topping that I use is a super secret family recipe for a sweet potato casserole that my late Aunt Rosey used to make for Thanksgiving every year, so I've pulled another one from here which looks pretty similar.

Now, preheat your oven to 350 degrees and prepare 2 12-cup muffin tins by either greasing them or inhabiting with a paper liner. Drop enough pumpkin batter into each cup so that it covers the bottom, about 1 1/2 tablespoons. Take about 1-2 teaspoons of the cream cheese mixture and press it into the pumpkin mixture in each muffin cup (but don't press it all the way to the bottom of the muffin cup), then cover the cream cheese with the remaining pumpkin batter. Evenly distribute the pecan topping over the muffins and bake for 20 minutes, rotating the pans halfway through (two pans don't fit next to each other in my oven, so I put 1 pan on each oven rack and then switch them halfway through the baking process). Let cool in pans for 5 minutes, then move the muffins to a cooling rack to cool completely.

These muffins won't remain uneaten long enough for you to worry about them expiring, so just don't worry.


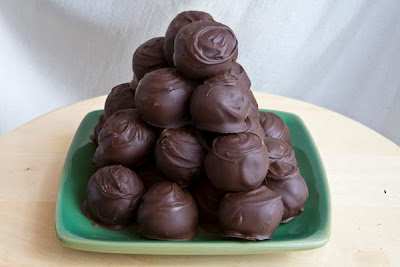
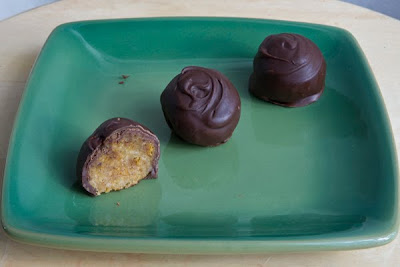
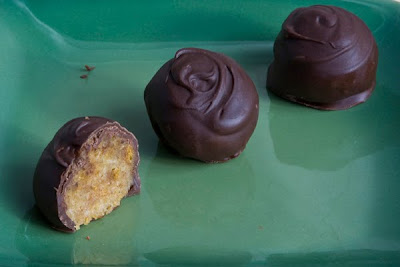
Incidentally, these muffins are also really good if you throw a cup of chocolate chips into the batter. Which brings me to my next point: Pumpkin Spice Cake Truffles, also known as Cake Balls.


Here's what else you need for the truffles:
8 oz cream cheese, softened
slightly less than 1/2 stick butter, softened
pinch salt
1 teaspoon vanilla
1 3/4 cups powdered sugar

24 oz semisweet chocolate chips (at least! you need a lot of chocolate for the dipping process)
vegetable shortening

Preheat your oven to 325F. Grease and flour a 9x13 in baking pan, then dump in your pumpkin mixture and bake it until it's done (meaning you can stick a toothpick in there and it comes out clean), about 40-50 minutes I think. Keep an eye on it though because I can't remember exactly how long I baked it for. When the cake is done, cool it in the pan for 10 minutes or so, then flip it out onto a cooling rack. Cut it into large pieces to speed up the cooling process.

In a large bowl, cream together the cream cheese and butter until very thoroughly mixed. Add the salt and vanilla and beat to combine. A little at a time, beat the powdered sugar into the cream cheese mixture until you've reached the desired sweetness. You don't want it to be too sweet because you're going to add it to the pumpkin later and then dip it all in chocolate, and I hear diabetes is difficult to manage. By the way, you've just made some form of cream cheese icing.

When the cake is completely cooled and the icing is ready, crumble the cake into the large bowl which conveniently already contains your icing! The cake will be moist and delicious, so feel free to eat a couple bites but don't worry if it smooshes and sticks rather than crumbles. With a fork, mix the cake into the icing. Seriously, use a fork. Prongs will further break up the cake pieces in the mixing process, so if you have a 5-pronged fork, that's even better. Use a spatula or something to scrape the sides and bottom of the bowl to make sure all the icing is mixed into the cake. Cover your bowl and go watch Modern Family or something for a little while.

When you come back later, mix up your pumpkin cake/cream cheese icing mixture, then prepare every single baking sheet/tray you can find in your house because I'm telling you, you're going to need it. And by "prepare" I mean cover in a layer of waxed paper. With one of those nifty cookie dough scoops (or a spoon if you don't have a cool scooper), scoop the cake mixture and roll into a ball, then put the ball on the baking sheet and leave him be. Make him some friends. Trays and trays of friends. It took me 4 trays total with these little cake buddies pretty close together. After you fill a tray, stick it in the freezer.

When you have exhausted your cake mixture supplies, get a medium bowl and a metal pot, and make a double boiler in this manner: Fill the pot with about 1-2 inches of water, and put your bowl on top of that. If the bottom of the bowl is sitting in the water, dump some of the water out; you don't want the bowl to fraternize with the water! It might burn your chocolate :( Next, turn the stove on high to get your water boiling and add a bunch of chocolate chips to your bowl, then throw in a tablespoon or two of shortening for good measure. If your water starts boiling and spitting steam/boiling droplets of water at you from the crack between the pot and the bowl, turn your water down to medium-lowish, and keep it at a simmer. Once the chocolate and shortening are melted and mixed together, turn off the stove and remove the bowl from atop the pot (but keep the pot nearby in case the chocolate becomes too cool and needs remelting).

Keeping all but the tray you're working with in the freezer, coat the cake balls in the chocolate by letting them frolic in the mud one at a time. You can use a fork to do this, or a spoon, or your fingers (but be careful with fingers because the chocolate will be really hot!). Then use desired instrument to remove them from the chocolate and return to their original place on the tray. (It's very important that you don't let them get out of order.) Once all of the truffles have been chocolatized, stick the pan in the fridge so the chocolate can harden.

Store these guys in a tupperware (or six or seven. Seriously, this recipe makes A LOT) in the fridge.


If you make this, I advise you to either go ride your bike or buy stretchy pants because these things are addictive. You've been warned.

Friday, October 15, 2010

My First (Moderately Successful) Foray Into Fondant


My best friend once said that she liked elephants, and ever since then it's been her "thing". Every gift-giving occasion, she gets at least one elephant-type present without fail, and by now she has way more elephant candle-holders than any one person should probably have. I'm not saying she doesn't like the elephant gifts, just that she isn't as elephant-crazed as her room decorations might suggest. Anyway, her birthday was mid-september and her mom asked me to make the cake, and of course I obliged (I can't pass up an opportunity to feed people, it's in my Jewish blood). The cake was carrot, and I made the elephant topper out of marshmallow fondant so that I could contribute to the elephant theme in a non-permanent way. Now what I'm about to say next may come as a bit of a shock but please don't be mad... I didn't take any pictures of the inside of the cake :( That weekend was particularly busy for me and the weather was dark and gloomy which makes for bad food pictures anyway. But to make it up to you (all you readers out there... anyone?) I'm going to share the best carrot cake recipe I've ever come across. And next time I make it - because there will be a next time - I'll make sure to get plenty of pictures so that I can repost it. And now for the recipe:

Ultimate Carrot Cake
adapted from I don't know where...

Cake:
1 cup white sugar
3/4 cup brown sugar
5 eggs
1 1/2 cups oil
2 1/2 cups flour
1 teaspoon salt
2 teaspoons baking soda
1 teaspoon cinnamon
1/2 teaspoon ginger
1/4 teaspoon cloves
1/8 teaspoon nutmeg
1/8 teaspoon allspice
1/2 cup walnuts, toasted and chopped
1/2 cup unsweetened coconut
1 1/3 cups apples, chopped
3 packed cups carrots, grated

Cream Cheese Frosting:
8 oz. cream cheese, softened
1/2 cup (1 stick) butter, softened
dash salt
1 teaspoon vanilla
2 cups (give or take a little) powdered sugar

Preheat oven to 350° F. Beat sugar and egg together. Slowly add oil. Sift together flour, salt, baking soda, and spices; add to sugar mixture. Combine nuts, coconut, apples, and carrots. Add to batter and mix well on slow speed until just combined. Pour into 2 greased and floured round 9-inch tins. Bake 45 minutes or until done. Cool.

While the cake is cooling, cream the butter and cream cheese together. Add the salt and vanilla and combine, then add the powdered sugar, a bit at a time, until the frosting is the desired texture and sweetness. Frost and assemble the cake once completely cooled.

Since I don't have any cake pictures, here are some more of the elephant topper:

Tuesday, September 28, 2010

Comfort Food and Therapy Through Baking


Today started off really weird. First thing this morning, I got a text message that read: "UT Alert: armed subject reported last seen at PERRY CASTANEDA LIBRARY on 09282010 details to follow." It sounded like this guy was about to be arrested, so I wasn't too worried. Then a few minutes later, another text: "UT Alert: armed subject reported last seen at PERRY CASTANEDA LIBRARY SHELTER IN PLACE STAY WHERE YOU ARE AT MORE INFORMATION TO FOLLOW." Well, if that's not alarming! I spent over 3 hours sitting on my couch watching the news, wondering what was happening and whether or not I would have to go to school (I didn't!). The gunman reportedly fired shots into the air on the 6th floor of the library before shooting himself with an AK47 (how he got an AK47 into the library, I don't know). Luckily, nobody else was shot. The campus was put on lockdown while APD, UTPD, and SWAT searched for an alleged second suspect who was never found (and probably didn't exist). I could hear the alarms, sirens, and helicopters out my window, and when the students were evacuated from campus I could see them marching past my building. (I'm mostly writing this down because I don't want to forget my own account of what happened.) I am so glad that I wasn't on campus when this was happening (my classes would have been in the middle of it) and I think it's lucky that no one else was killed. Aside from this, other crappy things happen to people (unfortunately), and when really bad things happen people need to be comforted, and my favorite comfort takes form in chocolate chip cookies.


I've been using this recipe forever, and it comes from the back of a bag of nestle tollhouse chocolate chips.

Chocolate Chip Cookies

Ingredients
2 1/4 cups all-purpose flour (I use 2 3/4 cups)
1 teaspoon baking soda
1 teaspoon salt
1 cup (2 sticks) butter, softened
3/4 cup granulated sugar
3/4 cup packed brown sugar
1 teaspoon vanilla extract
2 large eggs
2 cups semi-sweet chocolate chips

Preheat oven to 375 (I usually do about 350).
Combine flour, baking soda, and salt in a bowl and set aside. Cream together the butter and sugar, then add the vanilla and eggs, one at a time, beating well after each addition. Gradually add the flour, then stir in the chocolate chips. Drop by spoonfuls onto cookie sheets and bake for 9-11 minutes. Cool on cookie sheets for a few minutes (I do about 5 minutes to keep the cookies chewy) and then transfer to cooling rack.

These cookies are even more amazing if you freeze the dough for a day or so after mixing, which gives the flavors time to meld together. Also, if you have some vanilla ice cream, these cookies make great ice cream sandwiches (put a scoop of ice cream between two cookies, then freeze overnight before eating).

Thursday, September 9, 2010

The Russians

When someone in my family needs vodka, or to call out a hit, we turn to The Russians. When one of The Russians needs a birthday dinner, they turn to my family. For the Russian Daughter's birthday back in mid-August, my mom and I cooked up a Greek feast, which is every bit amazing as it sounds. In preparation, we bought two containers of Grandma's hummus from the farmer's market and 3 jumbo-sized bags of jumbo-sized fresh pita, made Greek salad (complete with olives and feta), spanikopita, vegetable moussaka, grilled chicken, falafel, and for dessert, the Russian Daughter requested cannoli (not entirely Greek, but delicious nontheless). So allow me to present: the cannoli.


This recipe caused me stress. I must admit that I've never fried anything before on my own, and nobody with any experience was at the house to assist. It's probably by some miracle that I didn't burn the house down... I got off to a bad start: the oil needs to be about 375 degrees, and I misread the thermometer and thought the oil was ready when it was only 275. Into the trash go the first 3 cannoli shells. A bummer, really, because we were expecting nine people and the recipe makes 12 shells, which meant I couldn't screw up again. But I did. Luckily, you can buy boxes of six empty cannoli shells from the grocery store (thank god!). Following recipe courtesy of my... great grandmother? (Mom, can I get confirmation on that?)

Cannoli

For the dough:
1 3/4 cup flour, divided
1 tbsp sugar
1/4 tsp salt
1 tsp cinnamon
3 tbsp wine vinegar (this really makes the recipe!)
3 tbsp water
1 egg
2 tbsp soft butter

For the filling:
4 cups (2 lbs) Ricotta
1 cup confectioners sugar, sifted
1/4 tsp vanilla
6 tbsp grated semisweet chocolate
1/2 tsp cinnamon

Add the sugar, salt, and cinnamon to 1 cup flour. Make a well and add the vinegar and water. Beat in the egg, then the butter. Add remaining flour 1/4 cup at a time until dough is solid and lifts out of the bowl. Knead on a lightly floured surface until soft and smooth, about 8 minutes. Refrigerate 1 hour to overnight.

Heat oil in a very large pan (or a deep frier if you have one) to 375 degrees F. Divide the dough evenly into 12 balls and roll each one into a very flat (1/16" or so) circle. Roll each circle once before forming to make ovals. Roll each oval, one at a time, onto a 6" by 1" (in diameter) cannoli tube and fry 2 minutes, turning once. Cool on newspaper for a few minutes before removing the tubes to use again. After you've fried all of the shells, set them aside to cool completely while you make the filling.

Cream the ricotta for about 5 minutes. Add the rest of the ingredients and beat for an additional 4-5 minutes. Refrigerate if not using immediately.

To fill the cannoli, put the ricotta mixture in a very large ziplock bag and seal, then cut off one corner (or if you have some kind of jumbo-sized piping bags, that would work too). Fill both sides of each cannoli, then if you want, you can dip each end in melted chocolate and then chopped pistachios. Refrigerate until ready to serve.

These are best made the day of because after that, the shells tend to get soggy (but they're still good!).

Monday, August 30, 2010

Familial Bonds


My brothers and I have an understanding. For gift-giving holidays, they bequeath to me those items of a food-making nature, and rather than expressing my thanks with a Thank You card, I respond with something of a more practical nature (food, I make them food with my new food-making appliances). For my birthday this year I received from them knives of the utmost sharpness; a sleek, black crock pot for lazy - I mean busy - chefs; and (this post brought to you by) a bundt pan which bears a strong resemblance to that opera house in Sydney, Australia (you know the one). The bundt pan surrendured a peanut butter-banana cake with the sharpest corners I've ever been able to eat:

I used this recipe but instead of the accompanying chocolate frosting, I smothered my cake in a simple ganache.

Peanut Butter Banana Cake

1 cup butter, softened
1 cup sugar
2 eggs
1 teaspoon vanilla
1/2 cup buttermilk (or regular milk with a splash of vinegar)
3 medium bananas, mashed
1/3 cup creamy peanut butter
2 cups flour
1 1/2 teaspoons baking soda
1/2 teaspoon cinnamon
1/4 teaspoon salt
1 cup walnuts, optional

Preheat oven to 350 degrees.

In a large bowl, beat together the sugar and butter until light and fluffy. Beat in eggs, vanilla, and peanut butter.

In a separate bowl, combine the flour, baking soda, cinnamon, and salt.

Alternate adding the flour and buttermilk to the batter, then stir in bananas (and walnuts, if using).

Pour batter into a greased bundt pan and bake for 35-45 minutes or until a tester comes out clean. Let cool in pan for 15 minutes, then invert onto a cooling rack to cool completely.


Chocolate Ganache

1 cup semisweet chocolate chips
1 cup heavy cream

Heat chocolate chips and heavy cream in a double boiler, whisking constantly, until chocolate is completely melted. Let cool to room temperature or slightly warmer, then pour over the top of the cake.

Yum.

And yummm.

And have I mentioned, yum?

Up next: When Russians invade!

Thursday, August 26, 2010

Why Sometimes You Should Listen to Your Mother

(Sometimes, mom, I said sometimes!) My mother had been systematically weaseling the words "tiramisu brownie" into our conversations for a while when a long-ago friend of her's brought his family over for a visit. Needless to say, my mom jumped at the opportunity to convince me to make this dessert for them. I was reluctant because 1) I had yet to really enjoy tiramisu at any point in my life, 2) I hadn't planned on baking that day and I like a little time for some forethought, and 3) my mother hadn't bought exactly the right ingredients for the job, some major ones were missing completely, others were slightly different, and I was on the verge of throwing a very toddler-esque fit. My mom is a "throw what you have into a bowl and bake" kind of a cook, but I get my method from my very neat, very organized, must-do-things-the-right-way-the-first-time father. Yikes, bad combination. Luckily my mom convinced me to improvise where I needed to and just get the damn things done already, which is where the listening-to-your-mother part comes in: sometimes they know what they're talking about. So I gathered my head and screwed it back on as straight as I could, and got to work.


The original recipe came from this book (which I didn't read. I tried, it's just not my cup of tea):

which called for cutting the brownies into strips, dunking them in a coffee mixture, and layering with the mascarpone mixture a la Legit Tiramisu. I, however, was freaking out enough as it was (not to mention we didn't even have the right ingredients for the dunking) and decided to make the brownies, soak them in weak coffee, and just bury underneath a layer of mascarpone. It worked out quite well.

Tiramisu Brownies
serves a lot and at the same time, not nearly enough

For the brownies:
1 cup shortening
4 1-oz squares unsweetened chocolate
4 eggs
2 cups sugar
2 teaspoons vanilla
1 1/2 cups flour
1 teaspoon baking powder
1 teaspoon salt

Preheat oven to 350 degrees.
Melt shortening and chocolate together in a double boiler. Cool to room temperature. In a separate bowl, beat eggs with a mixer on high speed until light. Stir in sugar, then add chocolate mixture and vanilla. Sift dry ingredients over chocolate/sugar mixture, then mix well. Pour into a greased 9-by-13 pan (mixture will be thicker than your typical brownie batter) and bake at 350 degrees for 30 minutes. Set aside to cool.


For the topping:
8 egg yolks
1/2 cup sugar
1/4 cup milk
2 cups whipping cream
16 oz. coffee-flavored mascarpone cheese*
1/2 cup sugar
1 cup weak, freshly brewed coffee, cooled
2 1/2 oz. semisweet chocolate, chopped or grated
chocolate shavings

*if you can't find coffee-flavored mascarpone, mix a teaspoon or two of instant espresso powder into plain mascarpone


Whisk together egg yolks, sugar, and milk in a 2-quart saucepan until smooth and blended. Bring to a boil over medium heat, stirring constantly. As soon as mixture reaches a boil, remove from heat. Immediately refrigerate until cool (or put it in an ice bath to cool it down faster).

With an electric mixer, beat whipping cream at high speed until it forms very stiff peaks. Set aside in the refrigerator.

Mix the mascarpone cheese and sugar. Stir in the yolk mixture. Fold in the whipped cream.


To assemble:
Poke holes in the top of the brownie with a fork and pour the coffee evenly over the surface. Sprinkle with chopped/grated semisweet chocolate. Spread the mascarpone topping over the brownie and garnish with chocolate shavings. Store in refrigerator and serve chilled.